Laravel 8 Socialite Login with Facebook Account
In this article, we will learn about laravel 8 socialite login with facebook account, as you all know currently many websites provide different types of login authentication facilities to users like facebook login, login with google, login with GitHub, etc...
Here I will give you an example of laravel 8 login with a facebook account here I have used laravel 8 jetstream authentication for laravel social login example.
So, let's see laravel 8 login with facebook account, laravel 8 jetstream login with facebook, login with facebook in laravel 8.
Step 1 : Install Laravel 8 for socialite login with facebook account.
Step 2 : Install JetStream for Authentication
Step 3 : Install Socialite for laravel 8 login with facebook account
Step 4 : Create Facebook App
Step 5 : Changes in Config File
Step 6 : Create Controller for facebook login
Step 7 : Create Route
Step 8 : Add Code in Blade File
Step 9 : Add Column in Database
Step 10 : Update Model
Step 11 : Run Project for output of laravel social login
In this step, we will install laravel 8 for this socialite login with facebook account.
composer create-project --prefer-dist laravel/laravel laravel_8_facebook_login
In this step, we will install a jetstream. So, run the below command to install jetstream for laravel 8 jetstream login with facebook.
composer require laravel/jetstream
Now, we need to install livewire using the below artisan command and also we need basic authentication like login and registration otherwise you can install using auth command.
php artisan jetstream:install livewire
Now, Install Node and run the package.
npm install
npm run dev
Now, we will create a database using the migration command.
php artisan migrate
Now, we will install Socialite Package which provides API to connect with facebook accounts. So, run the below command.
composer require laravel/socialite
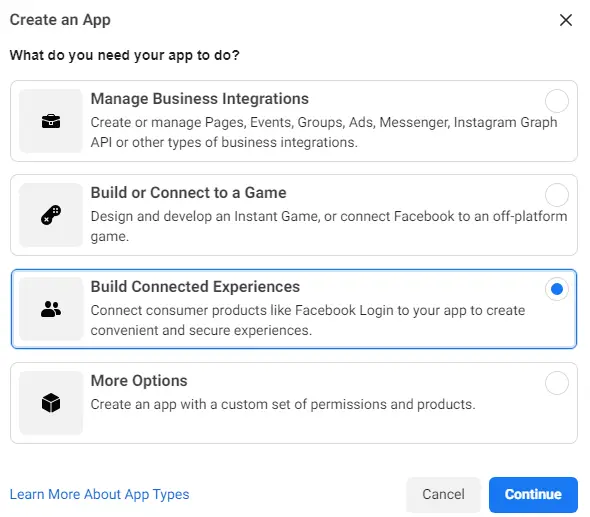
In this step, we will create an app on facebook like the below image.
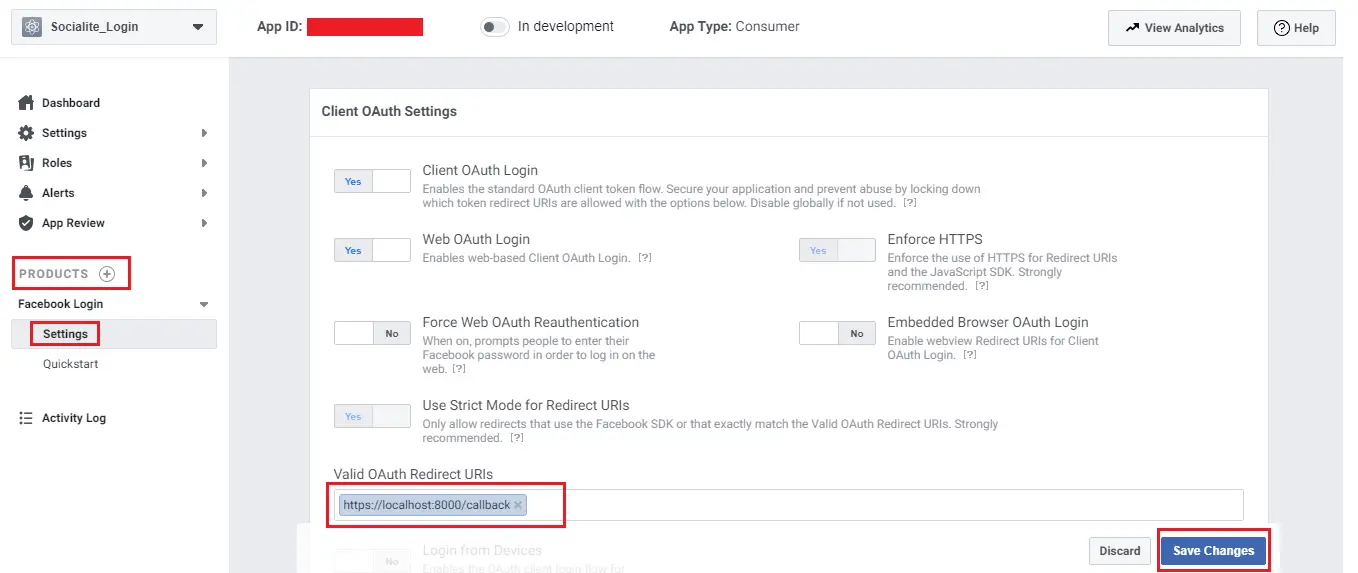
Now, Goto Facebook Settings and add your callback /redirect URL: https://localhost:8000/callback ‘Valid OAuth Redirect URL’ Save it as below image.
Now, we required facebook client id and secret key, if you don't have an app account then you need to create one from the below link. Create Facebook Account after creating an account you can copy the client id and secret key.

Now we will set app id, secret key, and call back URL in the config file. So, open this file config/services.php and add id and secret key.
<?php
return [
    'facebook' => [
        'client_id' => 'your client ID',
        'client_secret' => 'your client secret',
        'redirect' => 'http://localhost:8000/callback',
    ],
];
Now create Controller LoginWithFacebookController, in this controller we have added the redirect() function to redirect the user to Facebook, and the callback() function is used to handle the user when callback from Facebook.
<?php

namespace App\Http\Controllers;

use Illuminate\Http\Request;
use Exception;
use App\Models\User;
use Illuminate\Support\Facades\Auth;
use Laravel\Socialite\Facades\Socialite;

class LoginWithFacebookController extends Controller
{
    public function redirectFacebook()
    {
        return Socialite::driver('facebook')->redirect();
    }

    public function facebookCallback()
    {
        try {

            $user = Socialite::driver('facebook')->user();

            $finduser = User::where('facebook_id', $user->id)->first();

            if($finduser){

                Auth::login($finduser);

                return redirect()->intended('dashboard');

            }else{
                $newUser = User::create([
                    'name' => $user->name,
                    'email' => $user->email,
                    'facebook_id'=> $user->id,
                    'password' => encrypt('Test123456')
                ]);

                Auth::login($newUser);

                return redirect()->intended('dashboard');
            }

        } catch (Exception $e) {
            dd($e->getMessage());
        }
    }
}
Now, add routes on web.php file/
<?php

use Illuminate\Support\Facades\Route;
use App\Http\Controllers\LoginWithFacebookController;

Route::get('/redirect', [LoginWithFacebookController::class, 'redirectFacebook']);
Route::get('/callback', [LoginWithFacebookController::class, 'facebookCallback']);
Now add the below code in resources/views/auth/login.blade.php.
<x-guest-layout>
    <x-jet-authentication-card>
        <x-slot name="logo">
            <x-jet-authentication-card-logo />
        </x-slot>

        <x-jet-validation-errors class="mb-4" />

        @if (session('status'))
            <div class="mb-4 font-medium text-sm text-green-600">
                {{ session('status') }}
            </div>
        @endif

        <form method="POST" action="{{ route('login') }}">
            @csrf

            <div>
                <x-jet-label for="email" value="{{ __('Email') }}" />
                <x-jet-input id="email" class="block mt-1 w-full" type="email" name="email" :value="old('email')" required autofocus />
            </div>

            <div class="mt-4">
                <x-jet-label for="password" value="{{ __('Password') }}" />
                <x-jet-input id="password" class="block mt-1 w-full" type="password" name="password" required autocomplete="current-password" />
            </div>

            <div class="block mt-4">
                <label for="remember_me" class="flex items-center">
                    <input id="remember_me" type="checkbox" class="form-checkbox" name="remember">
                    <span class="ml-2 text-sm text-gray-600">{{ __('Remember me') }}</span>
                </label>
            </div>

            <div class="flex items-center justify-end mt-4">
                @if (Route::has('password.request'))
                    <a class="underline text-sm text-gray-600 hover:text-gray-900" href="{{ route('password.request') }}">
                        {{ __('Forgot your password?') }}
                    </a>
                @endif

                <x-jet-button class="ml-4">
                    {{ __('Login') }}
                </x-jet-button>
            </div>
            <div class="flex items-center justify-end mt-4">
                <a class="ml-1 btn btn-primary" href="{{ url('redirect') }}" style="margin-top: 0px !important;background: #4c6ef5;color: #ffffff;padding: 5px;border-radius:7px;" id="btn-fblogin">
                    <i class="fa fa-facebook-square" aria-hidden="true"></i> Login with Facebook
                </a>
            </div>
        </form>
    </x-jet-authentication-card>
</x-guest-layout>
In this step, add a column in the user table and set the name as facebook_id.
php artisan make:migration Add_Facebook_Id_To_Users
Now, add a new column in your code like below.
 public function up()
    {
        Schema::table('users', function (Blueprint $table) {
            $table->string('facebook_id')->nullable();
        });
    }
Now, update the model as below.
<?php

namespace App\Models;

use Illuminate\Database\Eloquent\Factories\HasFactory;
use Illuminate\Foundation\Auth\User as Authenticatable;
use Illuminate\Notifications\Notifiable;
use Laravel\Fortify\TwoFactorAuthenticatable;
use Laravel\Jetstream\HasProfilePhoto;
use Laravel\Jetstream\HasTeams;
use Laravel\Sanctum\HasApiTokens;

class User extends Authenticatable
{
    use HasApiTokens;
    use HasFactory;
    use HasProfilePhoto;
    use HasTeams;
    use Notifiable;
    use TwoFactorAuthenticatable;

    /**
     * The attributes that are mass assignable.
     *
     * @var array
     */
    protected $fillable = [
        'name', 'email', 'password','facebook_id',
    ];

    /**
     * The attributes that should be hidden for arrays.
     *
     * @var array
     */
    protected $hidden = [
        'password',
        'remember_token',
        'two_factor_recovery_codes',
        'two_factor_secret',
    ];

    /**
     * The attributes that should be cast to native types.
     *
     * @var array
     */
    protected $casts = [
        'email_verified_at' => 'datetime',
    ];

    /**
     * The accessors to append to the model's array form.
     *
     * @var array
     */
    protected $appends = [
        'profile_photo_url',
    ];
}
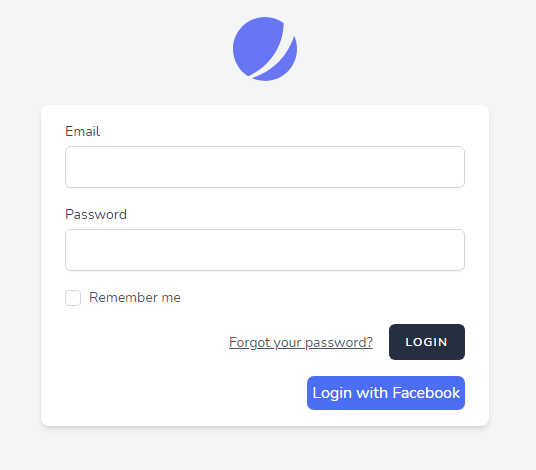
Now, we have done with our code and it's time to run our project.
Output :
You might also like :
- Read Also : How to Create Multi Language Website in Laravel
- Read Also : Laravel 8 Create Custom Helper Function Example
- Read Also : How To Integrate Stripe Payment Gateway In Laravel 8
- Read Also : Drag and Drop File Upload Using Dropzone JS in Laravel 8


