REST API With Passport Authentication In Laravel 9
In this article, we will see REST API with passport authentication in laravel 9. Also, we will perform CRUD operations with laravel 9 REST API. REST API is an application program interface that uses HTTP requests to GET, PUT, POST, and DELETE data.
Laravel provides an easy way to create API. If you have authentication in your mobile app then you can easily do it using the passport. Laravel passport provides a way to create auth tokens for validating users. If your application absolutely needs to support OAuth2, then you should use Laravel Passport.
So, let's see how to create REST API with authentication using a passport in laravel 9 application, laravel 9 rest API with passport authentication.
Step 1: Install Laravel 9
Step 2: Install Passport Using Composer
Step 3: Passport Configuration
Step 4: Add Table and Model
Step 5: Create API Routes
Step 6: Create Controller
Step 7: Create Eloquent API Resources
In this step, we will install laravel 9 using the following command.
composer create-project --prefer-dist laravel/laravel Laravel9_REST_API_Passport
Now, We are required to install Passport via the composer package.
composer require laravel/passport
After installation of the package, we were required to get default migration to create new passport tables in our database. So, run the below command.
php artisan migrate
Now, we will install the passport using the passport:install command, which will create token keys for security.
php artisan passport:install
Now, we have to configure the model, service provider, and auth config file.
1. HasApiTokens class of Passport has been added to the User model,
Add the below code in app/Models/User.php
<?php

namespace App\Models;

use Illuminate\Contracts\Auth\MustVerifyEmail;
use Illuminate\Foundation\Auth\User as Authenticatable;
use Illuminate\Notifications\Notifiable;
use Laravel\Passport\HasApiTokens;

class User extends Authenticatable implements MustVerifyEmail
{
    use Notifiable,HasApiTokens;

    /**
     * The attributes that are mass assignable.
     *
     * @var array
     */
    protected $fillable = [
        'name', 'email', 'password',
    ];

    /**
     * The attributes that should be hidden for arrays.
     *
     * @var array
     */
    protected $hidden = [
        'password', 'remember_token',
    ];

    /**
     * The attributes that should be cast to native types.
     *
     * @var array
     */
    protected $casts = [
        'email_verified_at' => 'datetime',
    ];
}
2. In AuthServiceProvider we have added "Passport::routes()"
Add below code app/Providers/AuthServiceProvider.php
<?php

namespace App\Providers;

use Illuminate\Foundation\Support\Providers\AuthServiceProvider as ServiceProvider;
use Illuminate\Support\Facades\Gate;
use Laravel\Passport\Passport;

class AuthServiceProvider extends ServiceProvider
{
    /**
     * The policy mappings for the application.
     *
     * @var array
     */
    protected $policies = [
        'App\Models\Model' => 'App\Policies\ModelPolicy',
    ];

    /**
     * Register any authentication / authorization services.
     *
     * @return void
     */
    public function boot()
    {
        $this->registerPolicies();

        //
    }
}
3. We have added API auth configuration in auth.php.
In config/auth.php add the below code.
<?php

return [

    'guards' => [
        'web' => [
            'driver' => 'session',
            'provider' => 'users',
        ],

        'api' => [
            'driver' => 'passport',
            'provider' => 'users',
        ],
    ],
];
In this step, we will create a migration of the Product table using the PHP artisan command. So, run the below command in your terminal.
php artisan make:migration create_products_table
After running the above command you will find migration in this path database/migrations. So, add the below code in your migration file to create a products table.
<?php

use Illuminate\Database\Migrations\Migration;
use Illuminate\Database\Schema\Blueprint;
use Illuminate\Support\Facades\Schema;

class CreateProductsTable extends Migration
{
    /**
     * Run the migrations.
     *
     * @return void
     */
    public function up()
    {
        Schema::create('products', function (Blueprint $table) {
            $table->id();
            $table->string('name');
            $table->text('detail');
            $table->timestamps();
        });
    }

    /**
     * Reverse the migrations.
     *
     * @return void
     */
    public function down()
    {
        Schema::dropIfExists('products');
    }
}
Now, run the below code in the terminal to create a migration.
php artisan migrate
And add the below code in the app/Models/Product.php file
<?php

namespace App\Models;

use Illuminate\Database\Eloquent\Model;

class Product extends Model
{
    protected $fillable = [
        'name', 'detail'
    ];
}
In this step, we will create API routes. Laravel provides an api.php file for writing web services routes. So, let's add a route in the api.php file.
routes/api.php
<?php

use Illuminate\Http\Request;
use Illuminate\Support\Facades\Route;
use App\Http\Controllers\API\RegisterController;
use App\Http\Controllers\API\ProductController;

Route::middleware('auth:api')->get('/user', function (Request $request) {
    return $request->user();
});

Route::post('register', [RegisterController::class, 'register']);
Route::post('login', [RegisterController::class, 'login']);

Route::middleware('auth:api')->group( function () {
    Route::resource('products', ProductController::class);
});
Now, I have created BaseController, ProductController, and RegisterController in the API folder.
app/Http/Controllers/API/BaseController.php
<?php

namespace App\Http\Controllers\API;

use App\Http\Controllers\Controller;
use Illuminate\Http\Request;

class BaseController extends Controller
{
    public function sendResponse($result, $message)
    {
    	$response = [
            'success' => true,
            'data'    => $result,
            'message' => $message,
        ];
        return response()->json($response, 200);
    }

    public function sendError($error, $errorMessages = [], $code = 404)
    {
    	$response = [
            'success' => false,
            'message' => $error,
        ];

        if(!empty($errorMessages)){
            $response['data'] = $errorMessages;
        }

        return response()->json($response, $code);
    }

}
app/Http/Controllers/API/ProductController.php
<?php

namespace App\Http\Controllers\API;

use App\Http\Controllers\Controller;
use Illuminate\Http\Request;
use App\Product;
use Validator;
use App\Http\Controllers\API\BaseController as BaseController;
use App\Http\Resources\Product as ProductResource;

class ProductController extends BaseController
{
    /**
     * Display a listing of the resource.
     *
     * @return \Illuminate\Http\Response
     */
    public function index()
    {
        $products = Product::all();

        return $this->sendResponse(ProductResource::collection($products), 'Products Retrieved Successfully.');
    }

    /**
     * Show the form for creating a new resource.
     *
     * @return \Illuminate\Http\Response
     */
    public function create()
    {

    }

    /**
     * Store a newly created resource in storage.
     *
     * @param  \Illuminate\Http\Request  $request
     * @return \Illuminate\Http\Response
     */
    public function store(Request $request)
    {
        $input = $request->all();

        $validator = Validator::make($input, [
            'name' => 'required',
            'detail' => 'required'
        ]);

        if($validator->fails()){
            return $this->sendError('Validation Error.', $validator->errors());
        }

        $product = Product::create($input);

        return $this->sendResponse(new ProductResource($product), 'Product Created Successfully.');
    }

    /**
     * Display the specified resource.
     *
     * @param  int  $id
     * @return \Illuminate\Http\Response
     */
    public function show($id)
    {
        $product = Product::find($id);

        if (is_null($product)) {
            return $this->sendError('Product not found.');
        }

        return $this->sendResponse(new ProductResource($product), 'Product Retrieved Successfully.');
    }

    /**
     * Show the form for editing the specified resource.
     *
     * @param  int  $id
     * @return \Illuminate\Http\Response
     */
    public function edit($id)
    {
        //
    }

    /**
     * Update the specified resource in storage.
     *
     * @param  \Illuminate\Http\Request  $request
     * @param  int  $id
     * @return \Illuminate\Http\Response
     */
    public function update(Request $request, $id)
    {
        $input = $request->all();

        $validator = Validator::make($input, [
            'name' => 'required',
            'detail' => 'required'
        ]);

        if($validator->fails()){
            return $this->sendError('Validation Error.', $validator->errors());
        }
        $product = Product::find($id);
        $product->name = $input['name'];
        $product->detail = $input['detail'];
        $product->save();

        return $this->sendResponse(new ProductResource($product), 'Product Updated Successfully.');
    }

    /**
     * Remove the specified resource from storage.
     *
     * @param  int  $id
     * @return \Illuminate\Http\Response
     */
    public function destroy($id)
    {
        $product = Product::find($id);
        $product->delete();

        return $this->sendResponse([], 'Product Deleted Successfully.');
    }
}
app/Http/Controllers/API/RegisterController.php
<?php

namespace App\Http\Controllers\API;

use App\Http\Controllers\Controller;
use Illuminate\Http\Request;
use App\Http\Controllers\API\BaseController as BaseController;
use App\User;
use Illuminate\Support\Facades\Auth;
use Validator;

class RegisterController extends BaseController
{
    public function register(Request $request)
    {
        $validator = Validator::make($request->all(), [
            'name' => 'required',
            'email' => 'required|email',
            'password' => 'required',
            'c_password' => 'required|same:password',
        ]);

        if($validator->fails()){
            return $this->sendError('Validation Error.', $validator->errors());
        }

        $input = $request->all();
        $input['password'] = bcrypt($input['password']);
        $user = User::create($input);
        $success['token'] =  $user->createToken('MyApp')->accessToken;
        $success['name'] =  $user->name;

        return $this->sendResponse($success, 'User register successfully.');
    }

    public function login(Request $request)
    {
        if(Auth::attempt(['email' => $request->email, 'password' => $request->password])){
            $user = Auth::user();
            $success['token'] =  $user->createToken('MyApp')->accessToken;
            $success['name'] =  $user->name;
            return $this->sendResponse($success, 'User login successfully.');
        }
        else{
            return $this->sendError('Unauthorised.', ['error'=>'Unauthorised']);
        }
    }
}
Now we have to create API resources, Laravel resource classes allow us to expressively and easily transform our models and collections of our into JSON.
php artisan make:resource Product
Now, a new file was created on this app/Http/Resources/Product.php path.
<?php

namespace App\Http\Resources;

use Illuminate\Http\Resources\Json\JsonResource;

class Product extends JsonResource
{
    /**
     * Transform the resource into an array.
     *
     * @param  \Illuminate\Http\Request  $request
     * @return array
     */
    public function toArray($request)
    {
        return [
            'id' => $this->id,
            'name' => $this->name,
            'detail' => $this->detail,
            'created_at' => $this->created_at->format('d/m/Y'),
            'updated_at' => $this->updated_at->format('d/m/Y'),
        ];
    }
}
Now, I have used POSTMAN API for testing purposes, Postman is a collaboration platform for API development. Postman's features simplify each step of building an API and streamline collaboration so you can create better APIs faster.
Here I have added some screenshots with descriptions of the postman for your better understanding.
1 - Register API: Verb: GET, URL:http://localhost:8000/api/register
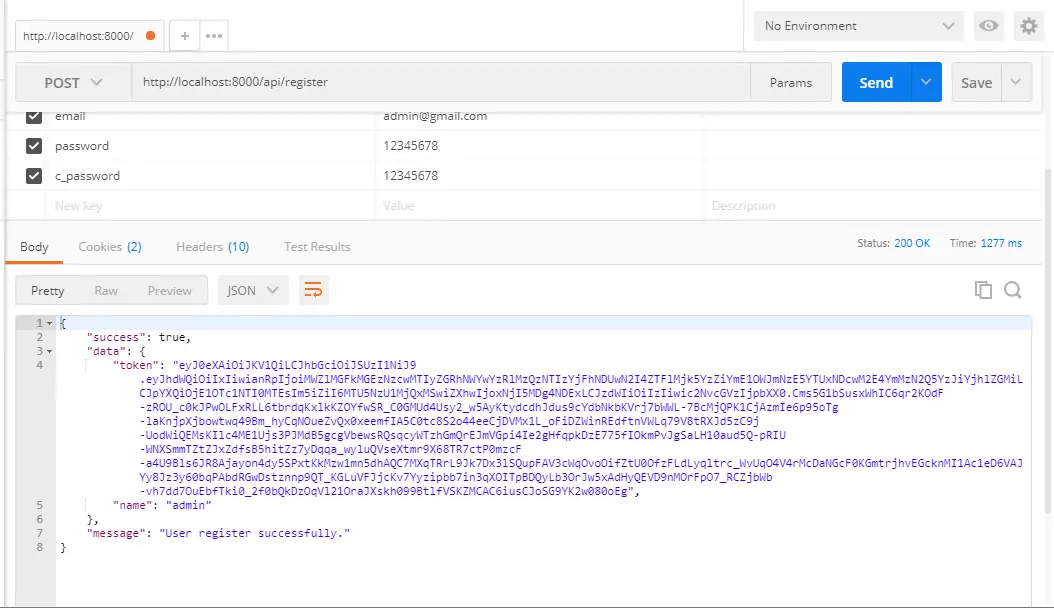
2 - After successfully registering in postman we need to add an access token in the headers.

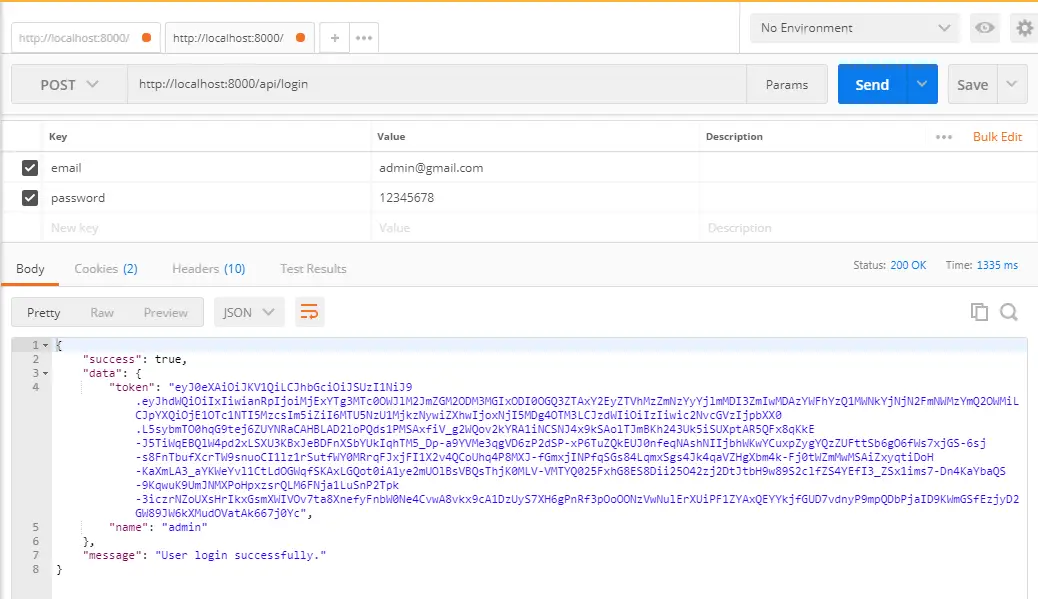
3 - Login API: Verb: GET, URL:http://localhost:8000/api/login
4 - Create Product List API: Verb: GET, URL:http://localhost:8000/api/products

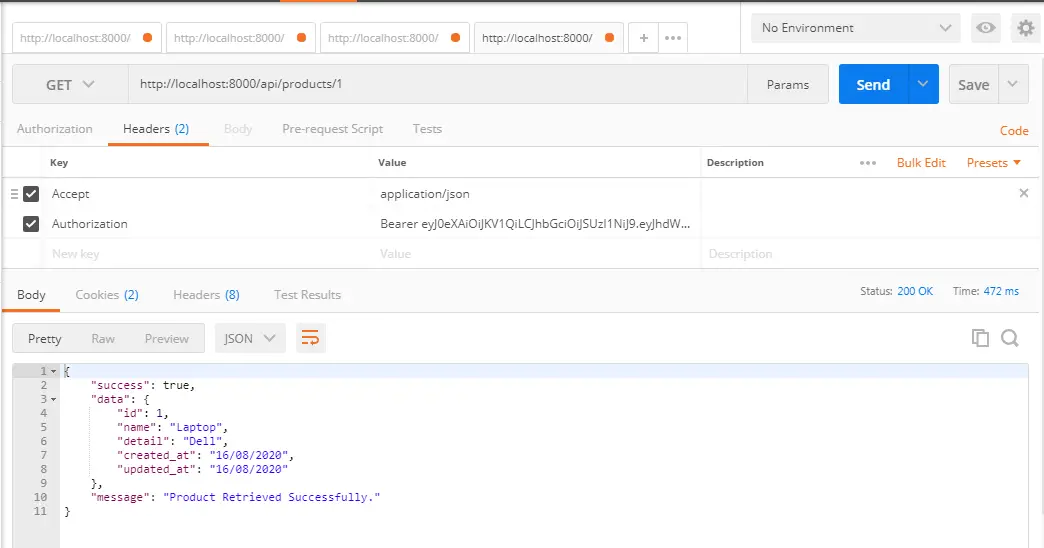
5 - Product Show API: Verb: GET, URL:http://localhost:8000/api/products/{id}
6 - Product Update API: Verb: PUT, URL:http://localhost:8000/api/products/{id}

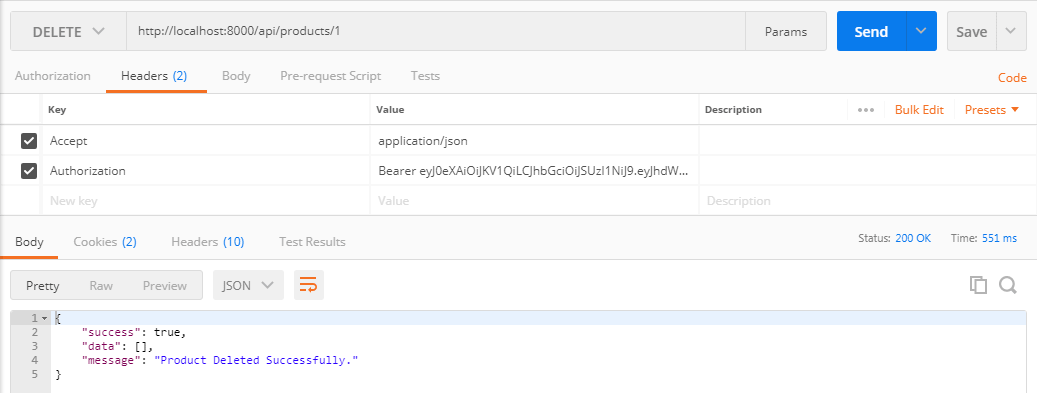
7 - Product Delete API: Verb: DELETE, URL:http://localhost:8000/api/products/{id}
You might also like:
- Read Also: Laravel 8 QR Code Generate Example
- Read Also: How To Check Occupied Disk Space In Laravel
- Read Also: How To Check Email Already Exist Or Not In Laravel
- Read Also: How To Integrate Paypal Payment Gateway In Laravel 8


