How to Deploy Laravel on Heroku with Database
In this tutorial, we will see how to deploy laravel on heroku with a database. Heroku is a cloud platform as a service (PaaS) supporting several programming languages. Developers use Heroku to deploy, manage, and scale modern apps. Heroku platform is elegant, flexible, and easy to use, offering developers the simplest path to getting their apps to market.
So, let's see how to deploy laravel on heroku with database, deploy laravel to heroku with database, deploy laravel website on heroku, how to host laravel project on heroku.
Heroku offers a free plan to help you learn and get started on the platform. Heroku buttons and buildpacks are free, and many heroku add-ons also offer a free plan.
Step 1 : Install / download Heroku CLI
Step 2 : Install Laravel Application
Step 3 : Create a proc file
Step 4 : Initialize git repo
Step 5 : Login into the Heroku and create App
Step 6 : Push Laravel changes to Heroku
Step 7 : Configure the postgresql Database on Heroku
Step 8 : Add the project files and run the migration
First of all, you need to download or install Hiroku CLI as per your operating system. here I have a window so, I have downloaded Hiroku-x64.exe from the official website.
You can also download from here : Download Heroku CLI
This installation method is required for users on ARM and BSD. You must have node and npm installed already.
npm install -g heroku
Now, we need to check and verify whether heroku is installed or not. So, copy the below command in your terminal.
heroku --version
Now, we are installing laravel application using the below command.
composer create-project laravel/laravel Laravel_8_Auth --prefer-dist
Inside the Laravel main folder create a file and set the name Procfile file. add the following line inside the Procfile file.
web: vendor/bin/heroku-php-apache2 public/

Initialize Git repository using the below command.
git init
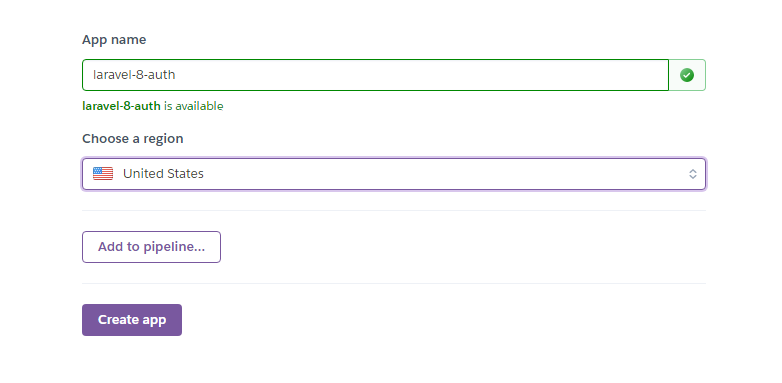
Now, login into heroku app using the web and create a new app file. here we have created a new app with the name laravel-8-auth
Now, add the below code for adding files on git and commit push changes as below.
git add .
git commit -m "laravel 8 auth heroku"
$ git push heroku master
we have used Postgres database because it is free on Heroku. So, we need to use an add-on database provision provided by Heroku. You can find more postgresql.
Type the following command to create a PGSQL database.
heroku addons:create heroku-postgresql:hobby-dev
Now, we need to config the database on heroku.
heroku config
After that, we will find 2 values as below.
- APP_KEY
- DATABASE_URL
Now, copy the DATABASE_URL and open your config >> database.php file.
First, change the default database to pgsql from MySQL.
Now, at the top, you need to define $DATABASE_URL = parse_url(“Your generated database URL, copy here”).
$DATABASE_URL=parse_url('Your database URL');
Now, your pgsql database config array looks like this.
<?php

use Illuminate\Support\Str;
$DATABASE_URL=parse_url('your database URL key');
return [


    'default' => env('DB_CONNECTION', 'pgsql'),


    'connections' => [

        'sqlite' => [
            'driver' => 'sqlite',
            'url' => env('DATABASE_URL'),
            'database' => env('DB_DATABASE', database_path('database.sqlite')),
            'prefix' => '',
            'foreign_key_constraints' => env('DB_FOREIGN_KEYS', true),
        ],

        'mysql' => [
            'driver' => 'mysql',
            'url' => env('DATABASE_URL'),
            'host' => env('DB_HOST', '127.0.0.1'),
            'port' => env('DB_PORT', '3306'),
            'database' => env('DB_DATABASE', 'forge'),
            'username' => env('DB_USERNAME', 'forge'),
            'password' => env('DB_PASSWORD', ''),
            'unix_socket' => env('DB_SOCKET', ''),
            'charset' => 'utf8mb4',
            'collation' => 'utf8mb4_unicode_ci',
            'prefix' => '',
            'prefix_indexes' => true,
            'strict' => true,
            'engine' => null,
            'options' => extension_loaded('pdo_mysql') ? array_filter([
                PDO::MYSQL_ATTR_SSL_CA => env('MYSQL_ATTR_SSL_CA'),
            ]) : [],
        ],

        'pgsql' => [
            'driver' => 'pgsql',
            'url' => env('DATABASE_URL'),
            'host' => env('DB_HOST', '127.0.0.1'),
            'port' => env('DB_PORT', '5432'),
            'database' => env('DB_DATABASE', 'laravel_8_auth'),
            'username' => env('DB_USERNAME', 'root'),
            'password' => env('DB_PASSWORD', ''),
            'charset' => 'utf8',
            'prefix' => '',
            'prefix_indexes' => true,
            'schema' => 'public',
            'sslmode' => 'prefer',
        ],

        'sqlsrv' => [
            'driver' => 'sqlsrv',
            'url' => env('DATABASE_URL'),
            'host' => env('DB_HOST', 'localhost'),
            'port' => env('DB_PORT', '1433'),
            'database' => env('DB_DATABASE', 'forge'),
            'username' => env('DB_USERNAME', 'forge'),
            'password' => env('DB_PASSWORD', ''),
            'charset' => 'utf8',
            'prefix' => '',
            'prefix_indexes' => true,
        ],

    ],


    'migrations' => 'migrations',


    'redis' => [

        'client' => env('REDIS_CLIENT', 'phpredis'),

        'options' => [
            'cluster' => env('REDIS_CLUSTER', 'redis'),
            'prefix' => env('REDIS_PREFIX', Str::slug(env('APP_NAME', 'laravel'), '_').'_database_'),
        ],

        'default' => [
            'url' => env('REDIS_URL'),
            'host' => env('REDIS_HOST', '127.0.0.1'),
            'password' => env('REDIS_PASSWORD', null),
            'port' => env('REDIS_PORT', '6379'),
            'database' => env('REDIS_DB', '0'),
        ],

        'cache' => [
            'url' => env('REDIS_URL'),
            'host' => env('REDIS_HOST', '127.0.0.1'),
            'password' => env('REDIS_PASSWORD', null),
            'port' => env('REDIS_PORT', '6379'),
            'database' => env('REDIS_CACHE_DB', '1'),
        ],

    ],

];
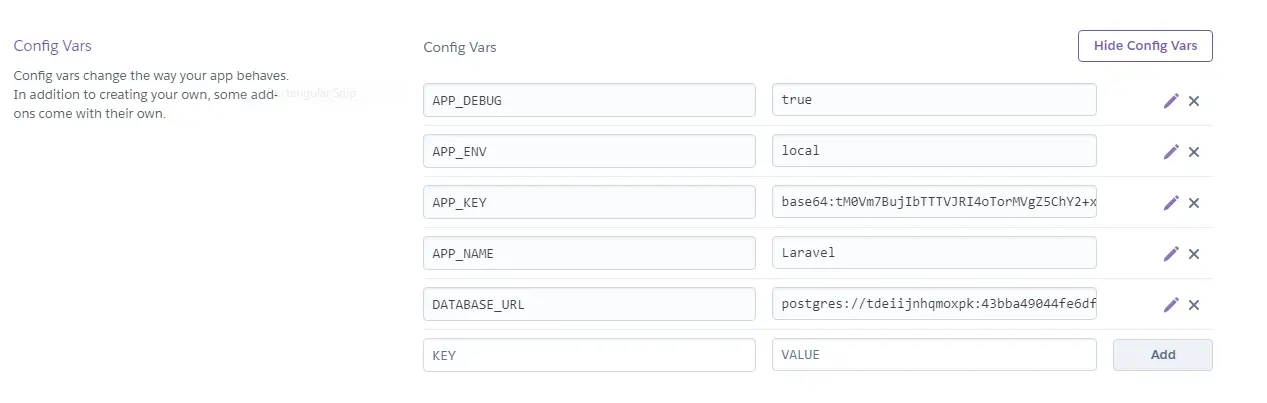
After changes on the databse.php file, we need to configure on heoku like the below image.
Now, add the file to the heroku and run the below command.
git add .
git commit -m "laravel 8 auth heroku"
$ git push heroku master
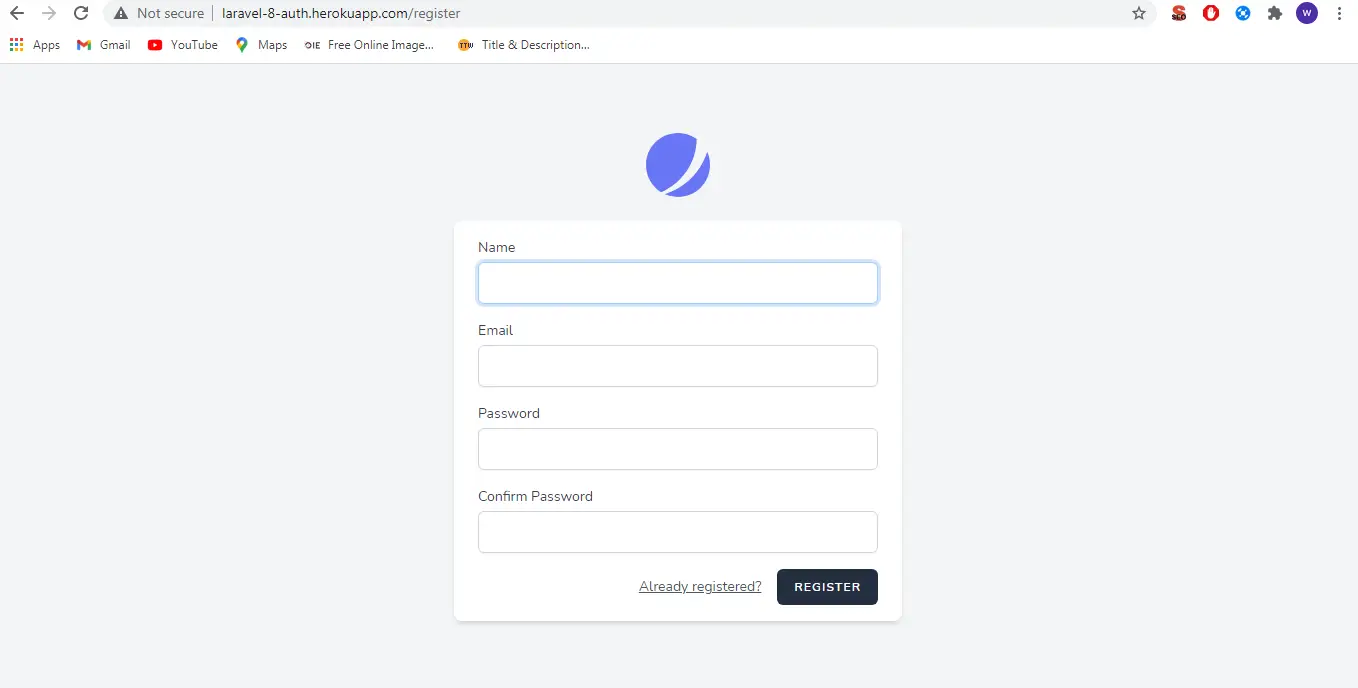
Run migration.
heroku run php artisan migrate
Now, enter yes if ask and you will be able to create the tables in the database. and finally, you will get the output of the authentication user like the below image.
You might also like :
- Read Also : Change Date Format Using Carbon In Laravel
- Read Also : Laravel 8 Socialite Login With Google Account
- Read Also : How To Integrate Stripe Payment Gateway In Laravel 8
- Read Also : Drag and Drop File Upload Using Dropzone JS in Laravel 8


